

AI infrastructure · Kubernetes · VMware Cloud Foundation
Most teams serve a model on Kubernetes the same way: a few vLLM pods behind a Service, with requests spread evenly. It works, but it wastes GPU time in ways nothing reports. llm-d is an open-source layer that sits in front of those pods and decides where each request should go. This post explains what it does, what is new in version 1.0, and what you need to check before running it on VMware vSphere Kubernetes Service (VKS).
Send the same chat traffic through round-robin and the llm-d router side by side, overload a shared cluster with and without priorities, split prefill and decode across 8 GPUs, and check whether you need llm-d at all.
What is llm-d?
vLLM is the engine that runs a model on a GPU. llm-d does not replace it. It manages many vLLM copies across a cluster and adds the parts a single engine cannot do on its own: routing each request to the best copy, splitting work across specialised GPU pools, keeping cached work in memory, and sharing the cluster fairly between teams.
Kubernetes sends each request to the next pod in turn. It knows nothing about prompts, cache or queue length. Every pod does every kind of work.
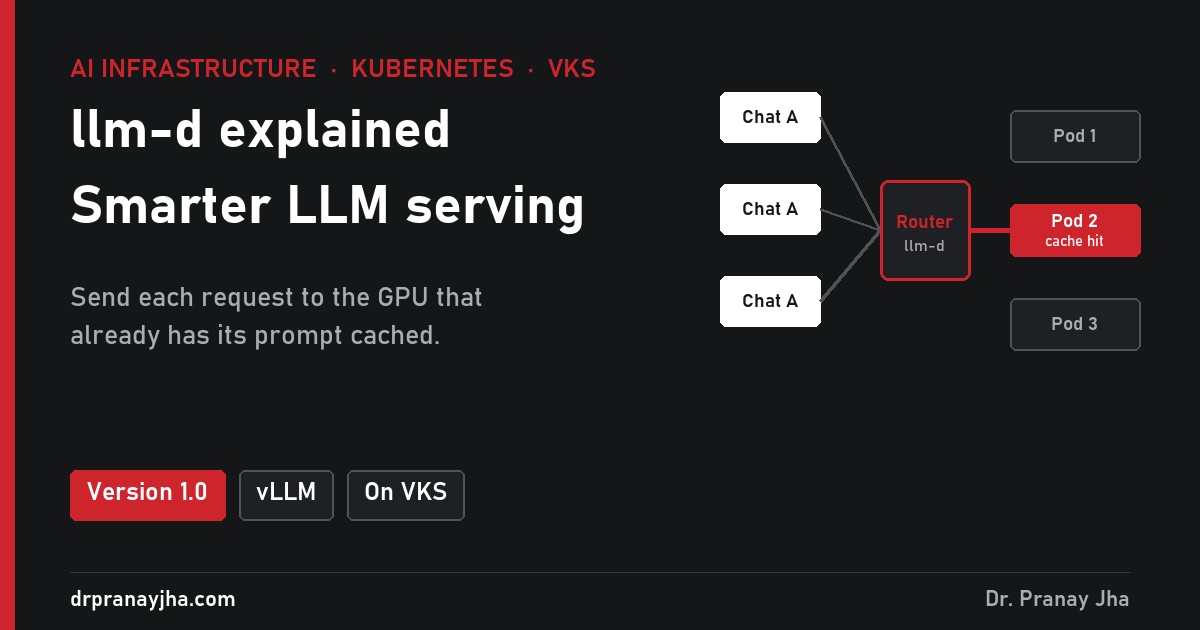
A router reads each request and the live state of every pod, then picks one. Repeated prompts land where their cache already is. Busy pods get fewer requests. Low-priority traffic waits when the cluster is full.
It was started by Red Hat, Google Cloud, IBM Research, CoreWeave and NVIDIA, and is now a CNCF Sandbox project. It runs on NVIDIA, AMD and Intel GPUs and on Google TPUs, with vLLM as the default engine and SGLang and TensorRT-LLM also supported.
Why does round-robin waste GPU time?
An LLM answers in two stages. First it reads the whole prompt, called prefill. Then it writes the answer one token at a time, called decode. Prefill produces a block of working memory called the KV cache. vLLM keeps that cache on the GPU, so if the next request starts with the same text, it can skip reading that part again.
That saving only works if the next request reaches the same pod. With round-robin across eight pods, a follow-up message in a chat has a one-in-eight chance of landing where its history is cached. The other seven times, a GPU reads the whole conversation again from the start.
Prefix-cache aware routing in one picture. The router knows which pod holds which cached prompt and sends follow-ups there, unless that pod is overloaded.
A simple worked example shows the size of the waste. These numbers are illustrative, not a benchmark.
AI agents repeat even more. An agent loop sends the same long instructions and tool list on every step, often dozens of times per task. The longer the shared beginning of your prompts, the more cache-aware routing saves.
How does llm-d work?
A proxy receives each request and asks the Endpoint Picker (EPP) where to send it. The EPP filters out unsuitable pods, scores the rest on cache, queue length and load, and picks one.
Built on the Kubernetes Gateway API Inference Extension.The router tracks which prompt beginnings each pod has cached and prefers that pod. llm-d can also move cache to CPU memory or SSD, and pull it from a neighbour pod.
Biggest win for chat, RAG and agents.Prompt reading is heavy maths. Answer writing is mostly memory reads. llm-d can run them on separate GPU pools and pass the cache between them over RDMA, so each pool is sized for its job.
Needs a fast, RDMA-capable network between nodes.Mixture-of-experts models such as DeepSeek spread their experts across many GPUs and nodes. llm-d has tested recipes for this.
Only matters for very large MoE models.Requests queue by priority and are shared fairly between tenants. When the cluster is overloaded, the lowest-priority traffic is dropped first instead of everything slowing down.
New in 1.0.KEDA scales replicas on the router’s own metrics, such as queue depth and token backlog, instead of CPU. An SLO-aware option scales on predicted latency.
Same idea as part 7 of my GPU series.How a request flows
A request through llm-d with prefill/decode split turned on. Most teams start without the split, using only the router and cache-aware routing.
What is new in version 1.0?
Version 1.0 focuses on running llm-d safely in production, with several teams sharing one cluster.
- Multi-tenant quality of service. Priority and fairness-aware queuing, with controlled load shedding when the cluster is full.
- Zero-downtime operations. A hot-standby router for high availability, and a
DisaggregatedSetresource that rolls out prefill and decode pods together so they never run mismatched versions. - Stable configuration. The router configuration API moved to v1, so configs written now should keep working.
- Agent-aware serving. Session-aware routing and turn-priority scheduling, plus support for
previous_response_idin the OpenAI-style Responses API. - Component versions. vLLM v0.31.0 and Gateway API Inference Extension v1.6.2.
How much faster is it?
These are the project’s own figures, published on its GitHub page from vendor and partner tests. I have not reproduced them, and your results depend on how much your prompts repeat and how busy the cluster is.
| Feature | Claim | Test setup |
|---|---|---|
| Prefix-cache routing | 3× output throughput, 2× faster first token vs round-robin | Llama 3.1 70B, 4× AMD MI300X |
| Predicted-latency routing | 40% lower time to first token and between tokens | NVIDIA GPUs, Google |
| Prefill/decode split | Up to 70% more tokens per second vs standard vLLM | gpt-oss, NVIDIA B200, AWS |
| Prefill/decode split | 10–30% throughput gain | gpt-oss-120b and Llama 3.3 70B, AMD MI300X, Oracle |
| KV offloading to CPU | 13.9× throughput at 250 users vs GPU memory only | 4× NVIDIA H100 |
Exact numbers will differ on your hardware, but the biggest gains come from cache-aware routing on workloads with long repeated prompts. Prefill/decode splitting gives smaller gains and needs much more infrastructure.
How do you run llm-d on VKS?
llm-d needs nothing VMware-specific. To llm-d, a VKS cluster is just a Kubernetes cluster with GPU worker nodes. The work is in getting those nodes, the network and the storage right first, and most of that is covered in earlier parts of my GPU series.
GPU worker nodes
Give the VKS cluster a node pool on a VM class with vGPU or GPU passthrough, then install the NVIDIA GPU Operator. vGPU keeps vMotion and maintenance mode working; passthrough does not. Part 10 covers the trade-offs.
Gateway and CRDs
Install the Gateway API Inference Extension CRDs. The quickstart runs the llm-d router in standalone mode with its own built-in Envoy proxy, so you do not need a separate gateway product to start. Check that the CRD versions do not clash with anything already installed in the cluster.
Load balancer
Expose the router with a normal LoadBalancer Service. On VKS it gets its address from whatever load balancer your Supervisor uses, NSX or Avi, the same as any other app.
Model storage
Each vLLM replica downloads the model weights at start-up, tens to hundreds of GB each. Keep a shared model cache on a persistent volume so new replicas start in minutes, not tens of minutes. See part 9.
RDMA, only if you split prefill and decode
Moving the KV cache between pods needs RDMA between worker VMs, which means RDMA-capable NICs presented to those VMs. This is the hardest part on VKS. Leave it until the basic setup is proven. Part 8 covers GPU networking.
Autoscaling and monitoring
Scale on the router’s queue metrics with KEDA rather than on CPU, and watch the cache hit rate. If it stays low, cache-aware routing is not helping your workload. See part 7.
Do you need llm-d?
Most teams should begin with the router alone. The router and cache-aware routing give most of the gain and need only a working GPU cluster. Prefill/decode splitting and wide expert parallelism are for large deployments that have already tuned the basics.
Not sure which row fits you? The llm-d Lab asks five questions about your setup and suggests where to start.
How do you install it?
The project calls its tested setups “well-lit paths”. The starting point is the Optimized Baseline: the router with cache-aware routing in front of two vLLM replicas of Qwen3-32B. The main steps from the 1.0 quickstart:
# 1. Get the release branch
git clone https://github.com/llm-d/llm-d.git
cd llm-d && git checkout release-1.0
source guides/env.sh

# 2. Inference Extension CRDs, namespace and Hugging Face token
kubectl apply -f https://github.com/kubernetes-sigs/gateway-api-inference-extension/${GAIE_URL}/v1-manifests.yaml
kubectl create namespace llm-d-quickstart
kubectl create secret generic llm-d-hf-token --from-literal="HF_TOKEN=${HF_TOKEN}" -n llm-d-quickstart

# 3. Router (standalone mode, built-in Envoy)
helm install quickstart ${ROUTER_STANDALONE_CHART} \
  -f guides/recipes/router/base.values.yaml \
  -f guides/optimized-baseline/router/optimized-baseline.values.yaml \
  -n llm-d-quickstart --version ${ROUTER_CHART_VERSION}

# 4. vLLM model servers
kubectl apply -n llm-d-quickstart -k guides/optimized-baseline/modelserver/gpu/vllm/base/
Variables such as GAIE_URL and ROUTER_CHART_VERSION come from guides/env.sh in the repository. Follow the official quickstart for the full steps and for AMD, Intel or TPU nodes.
- Your GPU nodes already run plain vLLM reliably, with the GPU Operator installed.
- You know how long your shared prompt prefixes are. Long, repeated prefixes are where llm-d saves the most.
- You run at least two replicas of the same model. With one replica there is nothing to route between.
- Model weights load from a shared cache, not a fresh download for every pod.
- You can see queue depth and cache hit rate, so you can prove the gain on your own traffic.
- RDMA is in place only if you plan to split prefill and decode.
Facts checked against the llm-d GitHub repository, its v1.0.0 release notes and the llm-d.ai architecture and quickstart pages. Performance figures are the project’s published claims, not my tests. More on running GPUs on Kubernetes and VCF: the 11-part GPU platform series.
About The Author



 DrJha