

So far the project has been a one-person show. This part is about letting other people in, and deciding exactly what each of them is allowed to do. Harbor keeps this simple with a small set of roles, so most of the work here is just understanding them and picking the right one.
The five roles
Harbor has five roles, from the least powerful to the most. This table is the part worth remembering.
| Role | What they can do |
|---|---|
| Limited Guest | Pull images, but with a restricted view of the project. |
| Guest | Pull images. Read-only. |
| Developer | Pull and push images. This is the everyday working role. |
| Maintainer | Everything a Developer can, plus scan, delete, and manage most project settings. |
| Project Admin | Full control, including adding members and changing the Configuration. This is you. |
The rule of thumb: give each person the least they need to do their job. Most teammates only ever need Developer.
Open the Members tab
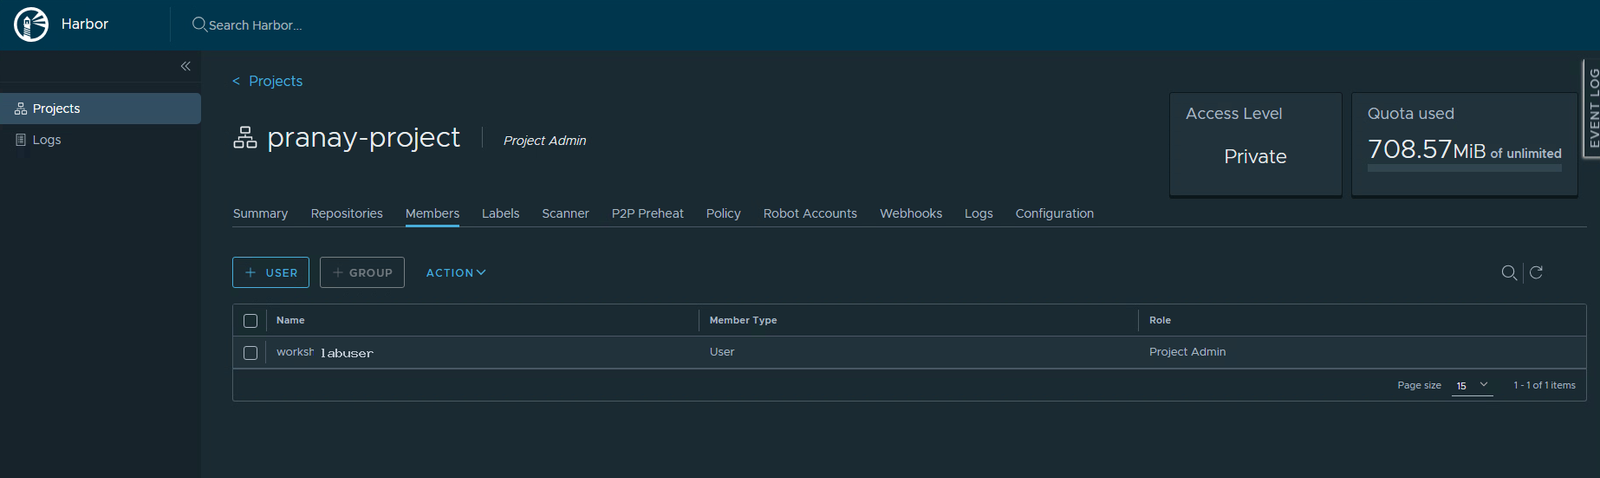
Open your project and click the Members tab. Right now there is one member, you, listed as Project Admin. This is where everyone who can touch the project lives.
Add a member
Adding someone is short:
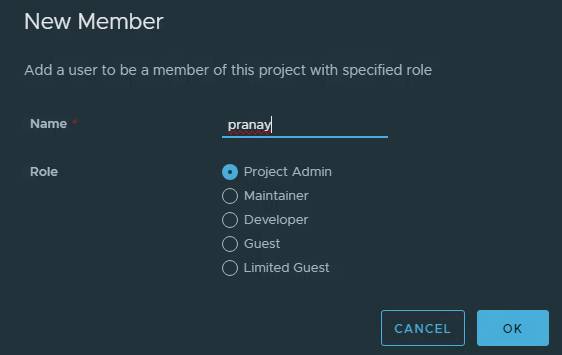
- Click + User. There is a + Group next to it for adding a whole team at once.
- In the New Member box, type the username of someone who already has a Harbor account.
- Choose a Role from the list. Start people on Developer unless they need more.
- Click OK. They now appear in the members list with that role.
Where new accounts come from
One thing trips everyone up here: the + User box only adds an account that already exists. It does not create a brand-new login. So where do new accounts come from? It depends on how your Harbor signs people in.
- Harbor with its own user database. A system administrator creates the account under Administration > Users. That menu only shows up for system admins, so as a Project Admin you will not see it. After the account exists, you add it here.
- Harbor with single sign-on (SSO). You do not create users at all. The person signs into Harbor once through SSO, which creates their account automatically. After that first login, their name shows up when you type it in the + User box.
- A login for a script, not a person. That one you can make yourself, right now, as Project Admin. It is called a Robot Account, and it is the subject of the next part.
If you do not have a second account to add and no admin rights to create one, that is completely fine. You can still open the + User box, see the five roles, and understand exactly how access works. The roles are the real lesson here, not the click.
Change or remove someone
People move teams and leave projects, so changing access is just as important as granting it.
- On the Members tab, tick the checkbox next to a member.
- Click Action.
- Pick a new role to change them, or choose Remove to take them out of the project entirely.
Quick recap
- Access is controlled by five roles, from Limited Guest up to Project Admin.
- Give each person the least they need. Developer covers most people.
- + User adds an account that already exists; it does not create one.
- New human accounts come from a system admin or from a first SSO login. New machine logins are Robot Accounts.
Next part
Part 8: Robot Accounts. The one kind of login you can create entirely on your own, built for scripts and pipelines so they never borrow your password.
Harbor for Beginners, Part 7 of 12. Product names belong to their owners.
About The Author







 DrJha
DrJha